-
×
 Canon GI-41 Ink Bottle, Black
1 × 4.800 OMR
Canon GI-41 Ink Bottle, Black
1 × 4.800 OMR -
×
 Ariete MOD 186 HOT DOG MAKER
1 × 3.800 OMR
Ariete MOD 186 HOT DOG MAKER
1 × 3.800 OMR
Subtotal: 8.600 OMR


SKU: TP Link HD 720P CLOUD CAMERA 300 Mbps WiFi NC 250
In stock
*View live HD video on your computer, tablet, or smartphone anywhere you have Internet
*Built-In Infrared LEDs give up to 16ft of visibility at night for 24/hr. surveillance
*Receive live email updates whenever the camera detects motion or sound
*Hear what’s happening at home through a built-in microphone
*Video Capture Resolution 720p
11.900 OMR
In stock
1. **Unboxing and Preparation**: Begin by unboxing the TP-Link NC250 Cloud Camera and its accessories. Ensure you have all the components, including the camera, power adapter, Ethernet cable, mounting bracket, and screws.
2. **Power On and Connection**: Plug in the camera to a power source using the provided power adapter. Wait for the camera to power on and initialize. Use the Ethernet cable to connect the camera to your router if a wired connection is preferred, or proceed with wireless setup.
3. **Wi-Fi Setup**: Download and install the “tpCamera” app from the App Store (for iOS) or Google Play Store (for Android) on your smartphone or tablet. Open the app and follow the on-screen instructions to create a TP-Link Cloud account or log in if you already have one.
4. **Camera Configuration**: Once logged in, tap on the “+” icon to add a new device and select the NC250 Cloud Camera. Follow the app’s instructions to connect the camera to your Wi-Fi network. Ensure your smartphone or tablet is connected to the same Wi-Fi network during setup.
5. **Mounting and Monitoring**: Choose an optimal location to mount the TP-Link NC250 Cloud Camera, ensuring it has a clear view of the area you wish to monitor. Use the provided mounting bracket and screws to securely attach the camera to a wall or ceiling. Once installed, use the tpCamera app to remotely monitor live video feeds, adjust camera settings, and receive motion detection alerts, providing you with enhanced security and peace of mind for your home or office.
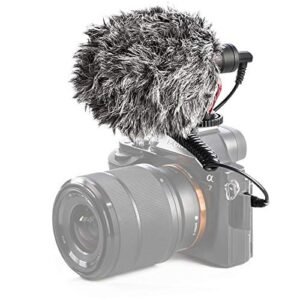
– Brand: CANDC
– Polar Pattern : Cardioid
– Professional Furry Windshield Included
– Compact and Lightweight Directional Mic
– Compatible with Smartphones, Tablets, DSLR Cameras, Consumer Camcorders, Audio Recorders etc
 New Arrivals
 Offers
 Service & Repair
There are no reviews yet.