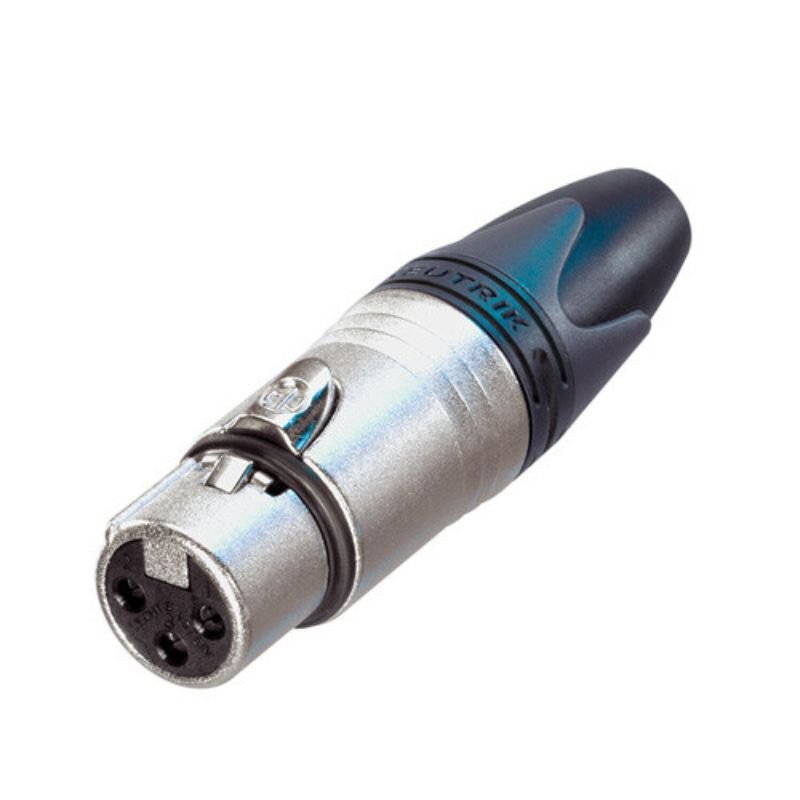
1. **Preparation**: Ensure that you have the necessary tools and equipment ready, including the Neutrik NC3MXX XLR Connector, a cable with XLR connectors, wire strippers, and a soldering iron.
2. **Stripping the Cable**: Use wire strippers to carefully strip the outer insulation from the end of the cable, exposing the inner wires. Be cautious not to damage the inner wires while stripping the insulation.
3. **Preparing the Wires**: Separate the inner wires of the cable, typically consisting of a ground wire (shield) and two signal wires (hot and cold). Trim any excess wires and twist each wire to prevent fraying.
4. **Preparing the Connector**: Unscrew the housing of the Neutrik NC3MXX XLR Connector to access the terminals inside. Slide the housing onto the cable, with the opening facing towards the stripped end of the cable.
5 . **Connecting the Wires**:Insert each wire into its corresponding terminal on the XLR connector. The ground wire (shield) typically connects to the terminal labeled “1” or “GND,” while the hot and cold signal wires connect to terminals “2” and “3” respectively.
6. **Soldering (Optional)**: If soldering is required for a secure connection, heat the soldering iron and apply a small amount of solder to each wire terminal. Be careful not to overheat the connector or melt any surrounding plastic components.
7. **Securing the Connector**: Once the wires are connected, carefully slide the housing of the XLR connector back into place, ensuring that the wires are not pinched or damaged. Tighten the connector housing securely to hold the cable and connector in place.
8. **Testing**: Before use, test the connection by plugging the XLR connector into a compatible device or cable tester. Verify that the signal is transmitting correctly and that there are no loose connections or signal interruptions.
9. **Final Inspection**: Perform a final inspection of the connection to ensure that all wires are securely connected and properly insulated. Check for any exposed wires or potential points of failure.
10. **Labeling (Optional)**: If necessary, label the cable or connector to identify its purpose or connection points. This can help streamline setup and troubleshooting in the future.
By following these steps, you can effectively install and use the Neutrik NC3MXX XLR Connector to create reliable audio connections for various applications.
 ANKER NEBULA MARS 2PRO D2323211 PORTABLE PROJECTOR
1 × 199.800 OMR
ANKER NEBULA MARS 2PRO D2323211 PORTABLE PROJECTOR
1 × 199.800 OMR  ADJUSTABLE ONE PIECE WAIST BAND TW 32093
1 × 3.900 OMR
ADJUSTABLE ONE PIECE WAIST BAND TW 32093
1 × 3.900 OMR 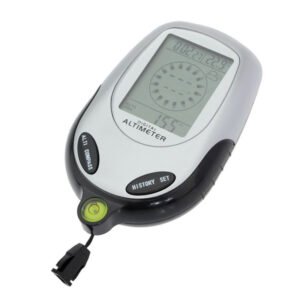 Multifunctional Digital Altimeter
1 × 6.400 OMR
Multifunctional Digital Altimeter
1 × 6.400 OMR  CPT Sr-2408 Range Royer P/B Car
1 × 4.900 OMR
CPT Sr-2408 Range Royer P/B Car
1 × 4.900 OMR  Candc DC C9 Cardioid Microphone
1 × 3.500 OMR
Candc DC C9 Cardioid Microphone
1 × 3.500 OMR  Kalimba 17 Keys Finger Piano
1 × 13.800 OMR
Kalimba 17 Keys Finger Piano
1 × 13.800 OMR  Cleo Plastic Recorder
1 × 0.700 OMR
Cleo Plastic Recorder
1 × 0.700 OMR  New Arrivals
 Offers
 Service & Repair


There are no reviews yet.