 New Arrivals
 Offers
 Service & Repair

HEART SHAPED SELFIE RING LIGHT + STAND
SKU: HEART SHAPED RING LIGHT
In stock
The Heart Shaped Selfie Ring Light with Stand is a compact and stylish lighting accessory designed for enhancing your selfies and videos. Shaped like a heart, it provides even and flattering lighting to your face, making your photos and videos look professional and well-lit. With its adjustable stand, you can position the ring light at the perfect angle for your shots. Compatible with most smartphones, this portable ring light is perfect for selfies, video calls, vlogging, and more.
2.900 OMR
In stock
1. **Setup the Stand**: Start by unfolding the stand and extending it to your desired height. Ensure that the stand is stable and securely positioned on a flat surface.
2. **Attach the Ring Light**: Fix the heart-shaped ring light onto the stand’s mounting bracket. Most ring lights come with a bracket or attachment mechanism that allows you to easily attach the light to the stand. Make sure the ring light is securely fastened to the bracket.
3. **Adjust the Angle**: Adjust the angle of the ring light to suit your needs. Most stands have an adjustable arm or head that allows you to tilt and rotate the ring light to your desired angle. Position the light so that it illuminates your face evenly and flatteringly.
4. **Connect Power**: Plug the power cord of the ring light into a power source. Depending on the model, the ring light may be powered by batteries or a USB cable. Ensure that the power cord is securely connected and that there are no exposed wires.
5. **Turn On the Light**: Finally, turn on the ring light using the power switch or button. Once powered on, adjust the brightness level using the control panel or dimmer switch to achieve the desired lighting intensity. You’re now ready to capture stunning selfies or videos with beautifully lit subjects.
Following these steps will help you set up and use the Heart Shaped Selfie Ring Light with Stand for your photography or videography needs.
Based on 0 reviews
Be the first to review “HEART SHAPED SELFIE RING LIGHT + STAND”
Related products
-
Electronics
DOBE PS4 TP4 016 Mobile Phone CLAMP
– GAMERS’ GOOD NEWS: Say goodbye to the painful control on your smart phone.
– LARGE CAPACITY:Maximum support of 6-inch mobile phone.
– 2 in 1 holder: With an OTG cable you can enjoy your game with PS4 controller and it can be a smart mount itself.
– RSKU: 06010501000028 -
Electronics, Stock Clearance
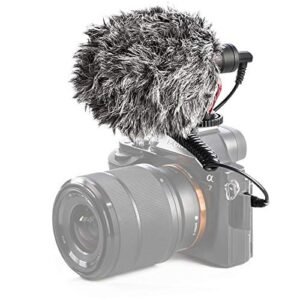
Candc DC C9 Cardioid Microphone
– Brand: CANDC
– Polar Pattern : Cardioid
– Professional Furry Windshield Included
– Compact and Lightweight Directional Mic
– Compatible with Smartphones, Tablets, DSLR Cameras, Consumer Camcorders, Audio Recorders etcSKU: Candc DC C9 Cardioid Microphone

There are no reviews yet.