-
×
 Max Dh 302 Microphone
1 × 25.000 OMR
Max Dh 302 Microphone
1 × 25.000 OMR -
×
 Cle Usb Fridge
1 × 5.900 OMR
Cle Usb Fridge
1 × 5.900 OMR
Subtotal: 30.900 OMR

SKU: D-Link DCS-8526LH HD Camera
In stock
Motorised 340° Pan & Tilt 110°, Full HD 1080p at 30fps
AI-based Person Detection, Motion & Sound Detection, Night Vision
Works with mydlink™ devices, Amazon Alexa, Google Assistant
mydlink™ Cloud recording, microSD card slot
Access via the free mydlink™ app & web portal
17.400 OMR
In stock
1. **Unboxing and Inspection**: Begin by unboxing the D-Link DCS-8526LH HD Pan & Tilt Wi-Fi Camera and carefully inspecting all included components. Ensure that the camera, mounting hardware, power adapter, and documentation are present and in good condition.
2. **Placement and Mounting**: Choose an optimal location to install the camera, considering the area you want to monitor and the Wi-Fi signal strength. Use the provided mounting hardware to securely attach the camera to the desired surface, such as a wall or ceiling.
3. **Power On and Setup**: Plug the power adapter into a nearby power outlet and connect it to the D-Link DCS-8526LH camera. Power on the camera by pressing the power button or plugging in the power adapter. Download and install the mydlink app on your smartphone or tablet, then follow the on-screen instructions to set up the camera and connect it to your Wi-Fi network.
4. **Camera Positioning and Configuration**: Use the mydlink app to adjust the camera’s pan and tilt functions to capture the desired viewing angle. Configure additional settings such as motion detection, sound detection, and video recording preferences according to your needs.
5. **Testing and Monitoring**: Once the camera is set up and configured, test its functionality by remotely accessing the live video feed through the mydlink app. Monitor the camera’s view in real-time and ensure that it provides clear and crisp HD video footage. Adjust settings as needed to optimize performance and ensure reliable surveillance.
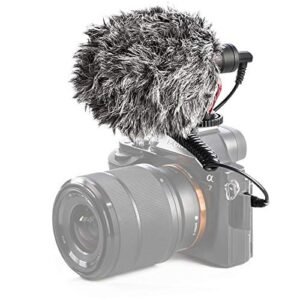
– Brand: CANDC
– Polar Pattern : Cardioid
– Professional Furry Windshield Included
– Compact and Lightweight Directional Mic
– Compatible with Smartphones, Tablets, DSLR Cameras, Consumer Camcorders, Audio Recorders etc
– GAMERS’ GOOD NEWS: Say goodbye to the painful control on your smart phone.
– LARGE CAPACITY:Maximum support of 6-inch mobile phone.
– 2 in 1 holder: With an OTG cable you can enjoy your game with PS4 controller and it can be a smart mount itself.
– R
 New Arrivals
 Offers
 Service & Repair

There are no reviews yet.